
Blow Dry Beautiful
Jody Dierksheide
Round brushing is an important key to a voluminous, sexy blowout, but it’s also something that too many are fearful to attempt outside of the salon chair. This technique is often intimidating to people, but with the right tools and a little practice, you can recreate that gorgeous and professional ‘just left the salon’ look at home.
The Tools
Let’s start off with the tools you’ll need. Aside from the requisite hair dryer, I have found that the best tools to use during a blow dry to achieve shiny, bouncy hair are a combination of a detangling brush and a bristle round brush.
Choosing the right brushes are essential to completing this look successfully, as well as avoiding the risk of getting a brush stuck in your hair. (We’ve all heard the horror stories)
Unless you’re in the market for a surprise cut, investing in the proper tools is incredibly important.
My go-to detangling brush is a classic Denman D31. It consists of a flexible red rubber base, with seven rows and eleven bristles per row. Its wide teeth placement rubber base allows for easy detangling and is a fantastic start for getting luxurious volume in the hair.
The next tool you’ll need is the round brush. I personally choose a brush by Regincós. This brush is a favorite due to the wooden core, natural boar bristle barrel, and lightweight cork handle. The wooden core doesn’t overheat and won’t cause damage to your hair, and the boar bristles aid in smoothing the cuticle layer, distributing styling product and the hair’s natural oils, and will not tangle like nylon bristle brushes. The tension is firm, but doesn’t pull too hard. I use this particular brush to not only create bend, but to “set” the hair like a roller, making it ideal to use for a polished blowout.
The Technique

Preparation: I begin with towel dried hair and add the appropriate product before I begin the blow dry. This will insure a more polished result whether you are looking for a full volume lift or sleek and glossy locks.

Step 1: Using the Denman D31 detangling brush, I begin in front of the ear and pick up hair along the hairline while blowing drying as I lift the brush out, up, and away, straight off the frame of the face. I continue this along the hairline and complete on the other side of the face. The benefit of this is literally creating a lift off the face and creating an impactful frame with the hair.

Step 2: The reminder of the hair is then blown dry with just my hand. I lift the hair up and away, straight off the scalp while blow drying to create more body and volume with the hair. You can even consider tipping your head forward and flipping your hair toward the floor and drying. This step is complete when the hair is 85-100% dry. You should be left with lot of volume and relatively or completely dry hair. Remember, this step is all done with your hand and not a brush.

Step 3: Next start with making a horse shoe-shaped part from ear to ear and clip the remaining hair up, leaving down the hair underneath the parting. Then, using your round brush, separate into manageable sections and blow dry by simply pulling the round brush from scalp to ends.
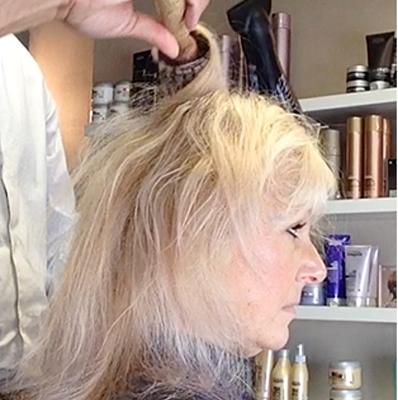
Step 4: Then bring more hair down using a horse shoe-shaped part again, this time from the temples of your head. Continue with the same blow drying approach using the round brush, but this time come off the head in a slight upward angle. When you reach the end of the hair, turn the brush under and roll the hair back to the scalp. Let it cool for about 15 seconds and then remove the brush. Complete this around the whole section.

Final Step: The remaining section is now the hair at the crown of your head. Start with a segment at the back of the crown, brushing in the same direction as your shoulders. The hair will be in front of the brush as you look in the mirror. Blow dry the remaining crown section by moving the brush and dryer straight up from the scalp and heating the hair. Do this a couple of times before bringing the brush forward toward your face. When you reach the end of the hair with the round brush, carefully roll the hair in the brush down to the scalp. Rest the brush and let it cool for 15-30 seconds, then gently unwind. We call this an on base roller set. It allows the hair to set and create maximum lift off of the scalp. Repeat this process for each remaining segment working toward the front hairline.
And a Few Tips to Consider
- Smaller brushes create a more wavy result, while larger brushes are perfect for a smoother straighter style.
- For volume, spray a mist of light hair spray while when hair is wet, and then add your favorite volumizing mouse for a little extra boost of hold.
- For a less voluminous, more smooth and silky blowout, consider using a smoothing cream or serum. I really like a bit of L’Oreal Mythic Oil.
- If you want to kick your blowout up a notch, after heating up each section of hair use a Velcro roller to roll back into the section instead of the brush. Leave the rollers in for the duration of your beauty routine and remove at the very end for and even longer lasting hold.

When you’re done, you’ll have a simply stunning style that will inspire, impress, and make everyone wonder how on earth you can manage to make it to the salon for a professional blowout so often.
For more information on Jody D. and the Jody D. Salon visit www.jodyd.com, and get daily tips, trends, and insider insight by liking on Facebook and following on Twitter and Pinterest.